Hypertrophy
Inverse Chains are my preferred mode for rowing and pulling. On most rows and pulldowns, you're strongest at the stretch and weakest in the shortened position. Inverse Chains put the most resistance where you're strongest and back off where you're weakest. Beyond Power also positions Inverse Chains for pull-dominant movements (Beyond Power).
I'm a Beyond Power affiliate. If you buy a Voltra with my link or code TISSUEGUY, I may earn a commission at no extra cost to you. Everything in this guide comes from my own training and programming with the unit.
Eccentric overload
- Load: +30% to +50% additive eccentric, depending on the situation.
- Tempo: a 2–5 second eccentric is enough.
- Intent: fight the eccentric. Don't just lower at the same speed as the concentric.
Inverse Chains: surfing the strength curve on pulls
- Load: 25–60% added resistance at the stretch.
- Feel: very smooth. Unlike Eccentric mode, it doesn't need a pilot rep to find your turnover.
- Experimental: I've occasionally stacked Eccentric overload on top of Inverse Chains. I have no data showing it beats either mode alone, so treat it as an experiment, not a recommendation.
Use the curve to decide where the set gets hard
Variable resistance profiles can make it easier to reach failure, or let you choose where in the range the set gets hard. That matters most on exercises that usually fail at one position because of a leverage disadvantage.
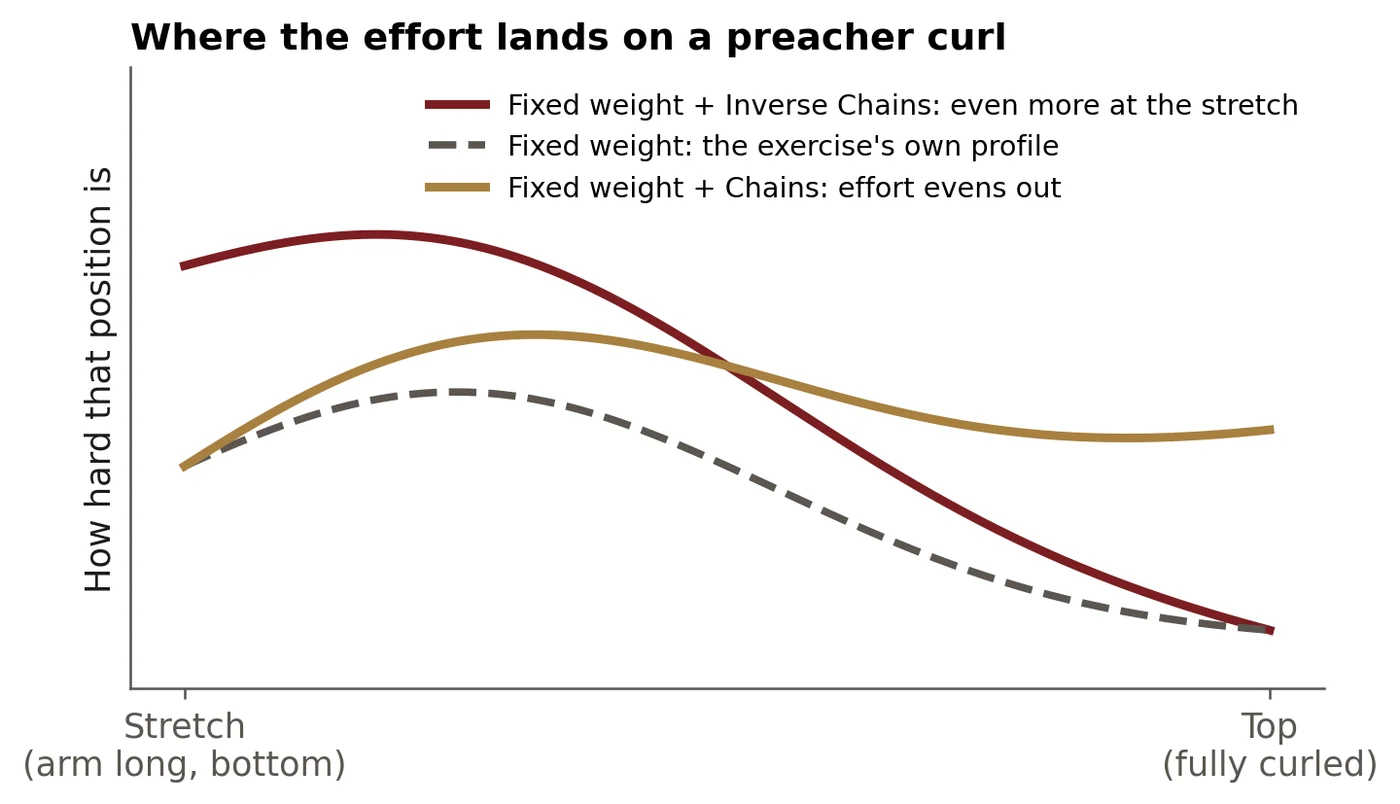
Take a preacher curl. Because of the pad angle, the exercise's leverage loads the lower, stretched part of the rep hardest, and the load falls off as you curl toward the top. If you want effort to stay consistent through the whole movement, make the top slightly heavier. Chains or a Band curve do exactly that.
Invert it with Inverse Chains and you add load where the exercise is already heaviest. You'd spend a ton of energy at the stretch and very little at the top. That's not necessarily good or bad. If the goal is to bias the lengthened position, it might be exactly what you want. If the goal is even effort through the range, it works against you. It's a fact to account for when you train for specific outcomes.
Custom Curves: the full version of surfing the resistance profile
Custom Curves are the clearest example of this whole idea. In the Beyond+ app you set the range of motion and cable length, choose where resistance rises and where it falls, and adjust how steeply it changes and where in the range it happens: early, middle or late (Beyond Power). Resistance doesn't have to move in one direction, either. It can peak mid-range and drop back down.
- Use them to match either the person's strength curve or the resistance profile of a given exercise or movement, depending on what you want out of it.
- Current limitation: one curve covers both phases of the rep. Separate concentric and eccentric curves would make this mode even more powerful.
The rules every Custom Curve has to follow
I ran test curves through Beyond Power's own curve checker in Beyond Cortex. These are the limits it enforces:
- Range of motion: 50–300 cm of cable travel. If your exercise moves the cable less than 50 cm, it can't be a Custom Curve. Use Chains or Inverse Chains instead.
- Force: a minimum of at least 5 lb, a maximum of up to 200 lb, and at least 20 lb between the two. If you only want the load to change by a few pounds, a percentage of Chains is the better tool.
- Shape: one turn at most. A curve can rise, fall, or rise then fall (one peak or one valley), but not wave up and down twice.
- Spacing and steepness: control points need at least 10 cm of cable travel between them, and the curve can't jump almost straight up.
- Twin Mode: Custom Curves don't run on paired units. Unpair first.
Recipe: an even-effort preacher curl
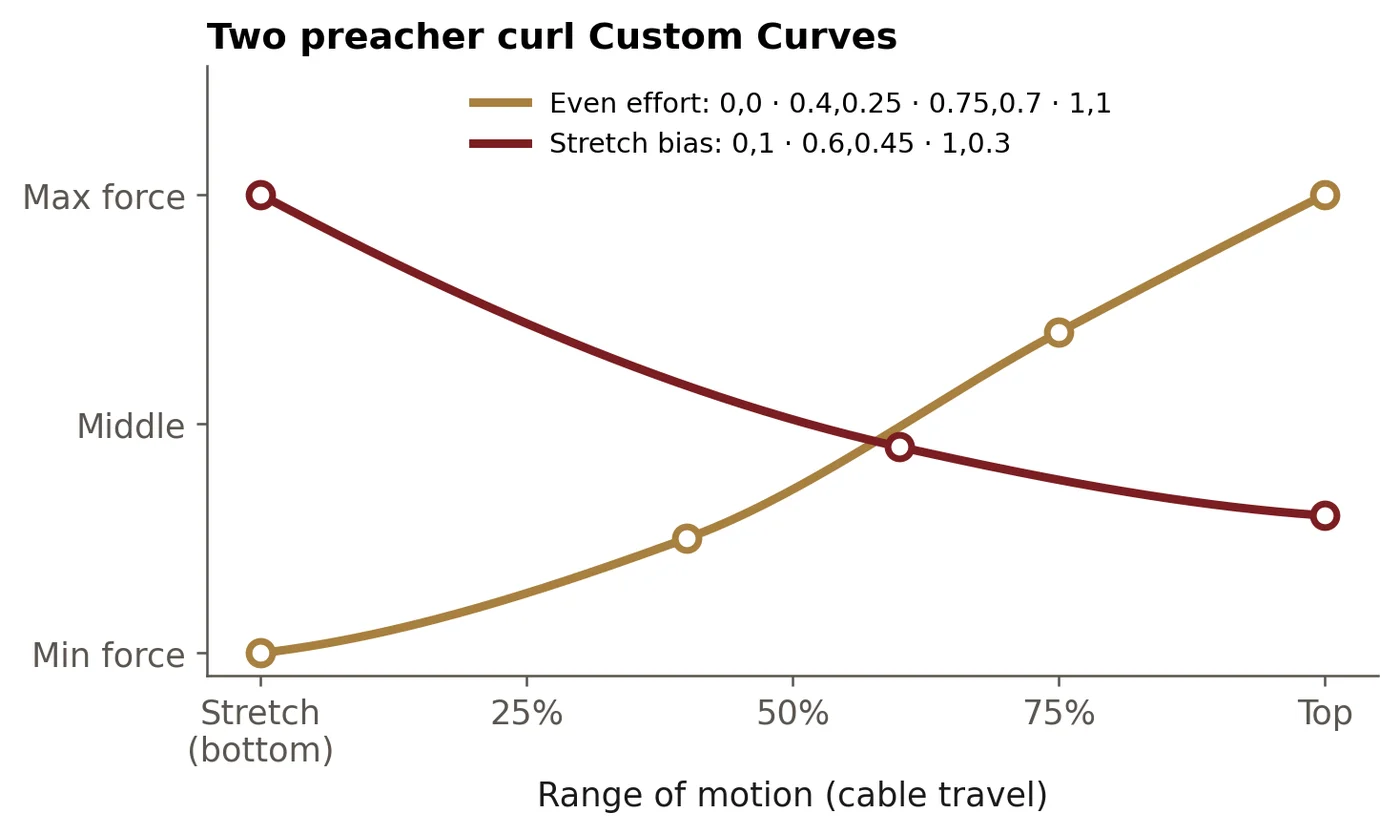
This is the Custom Curve version of the preacher curl idea above: lighter at the stretch, where the exercise is already hardest, and heavier toward the top.
- Range of motion: measure your actual cable travel from the stretched position to the top. It has to be at least 50 cm.
- Min force: the weight you can control at the bottom of the rep.
- Max force: at least 20 lb more than your min. That's the top of the rep.
- Shape: start at the bottom (0%), stay low through the first 40% of the range (about 25% of the way up the force scale), climb to about 70% by three-quarters of the way through, and finish at 100% at the top. In the app, drag the points into that shape. In Cortex, the points are `0,0;0.4,0.25;0.75,0.7;1,1`.
- Test it: do a light set first. If the top feels like a wall, flatten the last point. If the bottom still feels much harder than the top, raise the max force.
Want the opposite, a stretch-biased curl? Flip it: start at 100% at the bottom, drop to about 45% by 60% of the range, and finish near 30% at the top (`0,1;0.6,0.45;1,0.3`). Both shapes passed Beyond Power's curve checker.